Because your drill is misplaced in the jungle of toy, your kid is napping, and you still want tomatoes.

Why This Matters
You want fresh, healthy, vegetables. You want your kids to know where carrots come from (hint: not aisle 7). But you also want to keep all ten fingers. This guide is for you.

🧰 What You’ll Need (No Screws, No Stress)
– 8 concrete planter wall blocks (aka “planter corners” – they have slots for wood)
– 8 pieces of 2×6 boards, cut to your desired length (your local hardware store will cut them for you!)
– Level (you have a free on on your smart phone)
– Raised bed soil mix (or a blend of compost, topsoil)
– Optional: rebar stakes for extra stability
🩺 Doctor’s Note
You’ll see people recommend landscape fabric. Don’t. It’s a short-term fix with long-term consequences: airborne weed seeds will still land, and those synthetic layers mess with soil health, and eventually break down into microplastics. You don’t want that stuff ending up in your lettuce—or your cells.
Same goes for chemically treated lumber. Those chemicals can leach into your soil and straight into your veggies. If it’s your first go, use pine—it’s cheap, easy to work with, and by the time it starts to degrade, you’ll probably want to redesign things anyway. For a more durable option, go with redwood or cedar. They’re naturally resistant to rot and pests. Natural wood will eventually age and look a little ugly but you can replace them every few years easily. And if you’re really in your HGTV era, sand it smooth and finish it with a food-safe finish like tung oil (not paint! it is one of the biggest source of microplastic in the world).
📏 How Big Should It Be?
Size totally depends on your space and veggie ambitions—whether you’re aiming for “salad every day” or just a basil plant that survives longer than two weeks. But here’s the golden rule:
👉 Keep the width under 3 to 4 feet.
That way, you can reach into the middle from either side without stepping into the bed.

🪨 What About Soil?
If you’re just building a small bed or testing your green thumb, bagged soil from the hardware store will work fine. But for larger raised beds—or if you’re serious about growing real food—it’s time to think beyond the bag.
Skip the shrink-wrapped mystery dirt and go bulk.
Bagged soil can sit for months (or years), and that “soil” is often just tired dirt with dead beneficial microbes. For the good soil (dirt with live healthy beneficial microbes), head to your local landscape supplier or nursery and get it by “yard”. Be sure to ask about the compost to make sure it doesn’t have “biosolids”.
👉 A Reasonable Ratio:
– ~70% topsoil
– ~30% compost
Mix it together, dump it in, and boom—you’ve got living, breathing, veggie-growing soil that your plants and microbes will throw a party in.

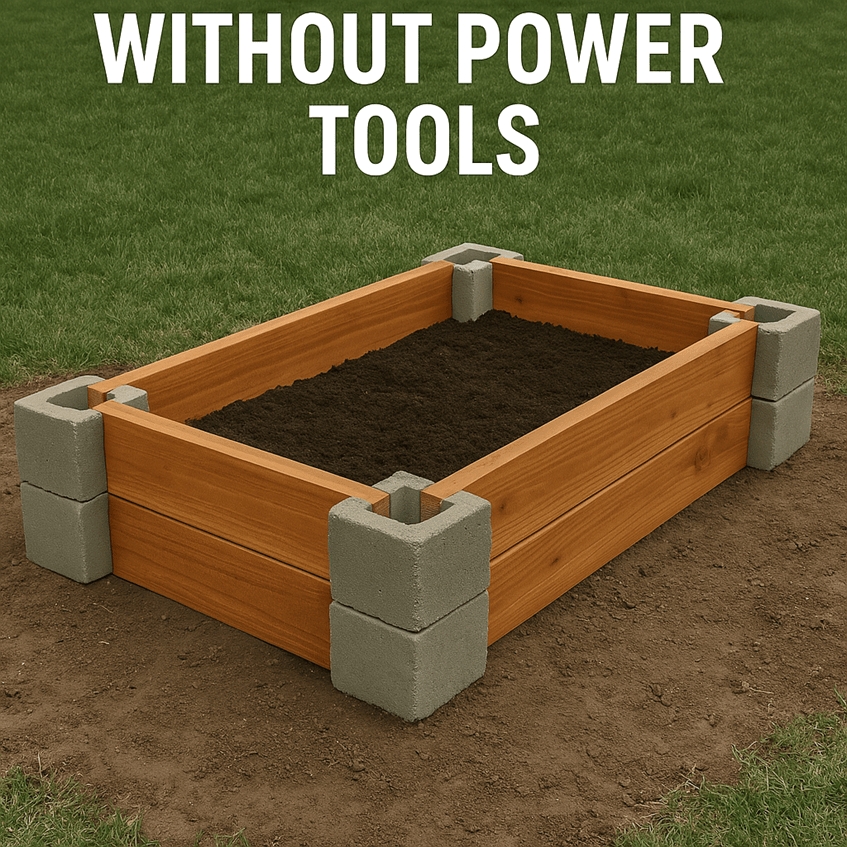
🛠️ Step-by-Step (No Power Tools, No Problem)
📸 Here’s what it looks like when it all comes together:
A raised bed built with wall blocks and natural wood—no screws, no drills, no problem.
1. Pick Your Spot
Choose a sunny patch.
2. Level the Ground
Use a rake or shovel to flatten the area.
3. Place the blocks at appropriate corners
4. Slot the Boards into the Planter Blocks
Like adult LEGOs. Stack two boards high for each side. No screws, no drills, no drama.
5. (Optional) Hammer in Rebar
If your kids are climbers or your dog thinks it’s a sandbox, add rebar through the block holes for stability.
6. Fill with Soil
Dump in your soil mix. Let your kid “help” and then secretly fix it later.
7. Plant Something Easy
Lettuce, basil, cherry tomatoes—stuff that grows fast and makes you feel like a garden wizard. (Buy the plant starts at your local nursery which will have the ones appropriate for the growing season).


Leave a comment